Antique clawfoot tub restoration
How to refinish an old clawfoot tub
We were determined to refinish the old, stained clawfoot tub in our beach house bathroom. It seemed difficult to have it professionally re-glossed or re-cleaned (it’s heavy!) so we decided to make it a DIY project. Luckily, it was surprisingly easy to do it ourselves and only cost us $50 and plenty of elbow grease. So let’s just dive into what worked (and what didn’t) and how we brought this baby back to life.
Before and after of the refinished navy blue clawfoot tub
Side-by-side before and after cleaning inside an antique clawfoot tub
Finding an Old Tub
We were lucky that this tub came with the beach house when we bought it, although its condition clearly left something to be desired. The room was literally collapsing around it and we ended up having to rebuild that entire part of the house to make it structurally sound.
A before photo of a beach house bathroom with crumbling walls and a dirty tub
If you want to buy one, you can often find sad, neglected clawfoot tubs for sale at architectural salvage stores or sites like Etsy. Obviously, it will cost you to buy and move it, but it could save you from buying a new bathtub in the end. And, just look at what we managed to do with our little hard work:
White bathroom with navy blue scrubbed clawfoot tub
We didn’t have to deal with refinishing our tub for several months while the rest of the house was under construction, but he patiently waited for us until the bathroom was almost done and put it back together. Be prepared. Here’s what we did:
Materials to clean your clawfoot tub
While every situation may be different, most tubs will require attention to both the outside and inside surfaces of the tub. The inside is mostly a cleaning process and the outside is mostly a painting process.
The interior must be clean and free of holes, flaking, cracks, deep scratches, or other damage to the glaze that may require professional repair or compromise its ability to retain water over time. Is. You will need:
- Soft sponge
- Scoring pad
- Spray bottle
- Bar Keeper’s Friend or other mild surface cleaner
- Heavy duty magic erasers
- Steel wool, fine grade (#0)
- Bathtub and tile refinishing kit (optional)
- Painter’s Multi-Tool (optional)
- Gloves (optional)
- The outside is more forgiving. While it should also be free of holes, damage can be more easily repaired or covered with paint. Here’s what we used on the outside of the tub:

- Fine-, medium-, and coarse-grit sanding blocks (optional)
- Rust removal drill attachment
- Power drill
- Lead paint test
- Dust mask
- A quart of clean metal primer
- A quart of anti-rust paint (in the color of your choice)
- Small foam paint rollers
- Chip paint brush
- Paint brush for oil paint
- Drop cloth or cardboard to protect your floor.
Step 1: Assess the damage.
Using a sponge and water, we first cleaned the inside and outside of the tub to assess what was surface dirt or soap scum, and what might be a deeper stain. We were most worried about rust spots because they can eat away at the finish and leave pits or holes in the glaze or ceramic.
Dirty inside of old claw foot tub with sponge.
Fortunately for us, a significant amount of dirt came out. This gave us hope that we could avoid hiring someone to reglaze the bathtub professionally. This was a big relief, as it is important to have a durable glaze coating on the inside surface that will stand up to cracking or chipping over the years.
Note: We later learned that home improvement stores sell tub and tile refinishing kits that are DIY epoxy applications that you can do at home. We haven’t tried it ourselves, but reviews online are largely positive. Some people report bubbling or a persistent smell, but if you only need to repair a small part of your tub and don’t want to pay to refinish the entire surface, this is a great option to try. May be.
Rust stains around the faucet holes in the claw tub
There were still plenty of caked on hard water stains that would take a lot of elbow grease, but we were happy to move the tub to the bathroom, not to a professional tub reglazer.
Step 2: Clean the inside with vinegar.
To remove some light stains, we mixed a solution of 1 part white vinegar and 1 part water in a spray bottle and coated the inside of the tub. We then used a little elbow grease and a green scouring pad to get all the easy stuff off.Cleaning the claw tub with a sponge and vinegar
It made a huge difference, though not enough that I’m ready to shower in there just yet.
A slightly cleaner white from the inside of the kilo-foot tub
Step 3: Give the inside a heavy-duty scrub.
A few readers recommended Bar Keeper’s Friend Soft Cleanser, but initial results were not good. We followed the directions to apply it to a damp surface, let it sit for a few minutes, and then wipe it off with a normal sponge. Our scars are not erased.
Sponges and bar keepers do the cleaning.
Step 4: Sand the outside.
Unlike the inside, the outside of our tub had a lot of rust and paint. Our first step was to sand the outside to get rid of the already chipped paint so we could have a relatively smooth surface to paint on.
Note: Always check old tubs for lead paint! Many people have this, which is extremely dangerous, especially if children are bathing in them. We were very happy to know that ours was clean.
Dirty outside of claw tub with rust spots.
We first sanded by hand using some coarse grit sandpaper and sanding blocks, but later found a more efficient way to use a rust removal drill attachment instead. It removed most of the loose parts of the old finish compared to a sanding block, and in much less time.
Note: We were both wearing heavy duty lead paint removal masks during all of this sanding just to be safe because tons of dust blows up and even though it checks to be lead free.
Attached attachment on drill buffing outside of old claw foot tub
Next, we went hand-in-hand with medium- and then fine-grit sanding blocks to smooth it out a bit more. It may have taken us several hours to get everything to the original finish, but in about 20 minutes we got it to a smooth-to-the-touch finish with no more jitter, and it’s good enough for the next step.
Rust removed from the outside of an old claw tub.
Step 5: Paint with a clear metallic primer.
After wiping with a clean towel, we were ready to prime. Based on long discussions with supporters at our local paint desk, we chose this oil-based Rust-Oleum Clean Metal Primer to do the job. This product is a triple threat when it comes to cleaning the outside of your claw foot tub:
- It covers existing rust.
- This prevents future rust.
- And it prepares the surface for paint.
can of RustOleum Professional High Performance Clean Metal Primer
We applied with small foam rollers for a smooth finish on large surfaces and then used cheap chip brushes to get under the lips and around the actual claws. Be warned that it’s very drippy (so protect your floors!) and smelly (so open your windows! and/or turn on the fan).
Applying primer to the kilo-foot tub using a small foam roller
Step 6: Paint the Outside.
Once the primer is completely dry, you can paint the exterior in the color of your choice. We considered a whole range of tub exterior colors, but we landed on Riverway by Sharon Williams. All straight taupe or gray felt a little too boring for a room with such a playful floor pattern, and we wanted to go significantly deeper than the small accent tiles in the floor so it didn’t seem like we were going to do it. Trying to meet. . .
Paint swatch on blue tile hex floor
We mixed the color in this Valspar Anti-Rust Armor paint at Lowe’s, which was recommended by a paint pro we spoke with. It is resistant to moisture and stains and contains some rust prevention additives. The literal description online says it’s great for “equipment, playground equipment, mailboxes, and tanks.” I know they probably meant things like propane tanks, but I laughed imagining someone hand-painting a giant military tank with this stuff.
Clean Clawfoot Tub Valspar Anti-Rust Armor Paint.
Again we used small foam rollers for most of this, and then we used a paintbrush intended for oil-based paint between the fingers. This paint was also quite smelly (which is why we re-applied the masks for this step) but it was much thicker than the primer.
Applying riverway paint to the feet of the 10-foot tub
You can choose to paint the feet an accent color (such as black, silver, or gold), but all of our inspiration photos of claw tubs featured a two-tone look with a white interior and colored exterior, not three-tone. The effect This is definitely something you can go for if you like that extra bit of bling!
A refinished vintage cloft is painted on the exterior of the tub.
You can see that the exterior is not perfectly smooth – you can still see the subtle topography of the old finishes under the fresh coat of blue paint. We really like that it gives the tuba a sense of age and history, like it’s been in the house for decades rather than us bringing in some new replica.
Navy blue paint refinish closet tub
Dappled dots or not, this is definitely a huge improvement! It took us about $50 and a lot of sweat, but we found something that looks pretty close to this Rejuvenation clawfoot tub that sells for $3,300!
- Side by side before and after refinish closet tub
- Now fast forward a few more weeks after the room was completely put together – and our plumber installed new bathroom fixtures – and we have this:
- White bathroom with navy blue scrubbed clawfoot tub
- And better yet, look how beautiful she looks in the water!
A full foot tub full of water
So we hope this inspires you to give any old, dirty clawfoot tub a second chance.
Clawfoot tub restoration
Antique Clawfoot Tubs For Sale Clawfoot bathtubs are on the rise and becoming popular again. Many people enjoy the large size and beautifully restored claw foot tub look. These porcelain antiques can be cleaned in a wide variety of options. A simple elegant white is the most common. But, you can also be very creative and create your own design.
Antique tubs for sale
Hardtops of Iowa has a large selection of antique foot or basin tubs for sale. Choose from our restored clawfoot tubs or create your own design from our selection of antiques. We have unfinished tubs ready to be customized. We can refinish claw foot tubs with any special exterior finish. You can also hydro dip, powder coat, or spray the feet in different colors.
Have questions or want to schedule an appointment for a free estimate? Call 712-262-0292!
Features
- Refinishing bathtubs, showers and sinks
- Countertop refinishing and resurfacing
- Repairing and finishing of porcelain bathtubs / fixtures
- Repair, repaint and refinish kitchen counters
- Re-painting and re-cleaning of equipment
- Acrylic repair and refinishing
- Repairing and refinishing of cultured marble and terrazzo
- Fiberglass repair and refinishing
- Repainting and refinishing of metal and ceramic tiles
- Porcelain reglazing
When we first visited our home, one thing that immediately made us say “Yes God Thank You King” was the three clawfoot tubs scattered throughout the house—one in the back of each house. In one bathroom, and one in the back of the house, the bathrooms mirrored each other as part of the lean-to addition, meaning the ceilings were seven feet high and steeply sloped, and the entire space Felt like a bathroom at a grunge concert venue. But the tub! The tubs were great.
Well, I mean they were right. They were old and covered in layers of fugly paint, sure, but we like low bars for a starting point, and we’re active enough on Pinterest to know that these iron treasures can be stripped down and Can be turned back up. But there were some big things missing from all the clawfoot tub DIYs I saw, like an easy way to repair any damage to the interior, what to do about bent legs, and how to retro a tub. Be fitted with plumbing already done. . Holes that don’t match with new plumbing fixtures.
If you’ve seen our bathroom suite reveal, you know we finally have it all figured out! Let’s do it, angel.Learn more about this renovation, or keep scrolling for a DIY!
The scoop on our pink shower
The scoop on our pink shower
- Before renovating our bedroom suite & After (Open Concept Bedroom Suite!!)
- Before and after renovation of our bedroom suite (Open Concept Bedroom Suite!!)
- 10 February 2021
- DIY CLAWFOOT Tub Refurbishment
- Cost: $100 – $300 / Total Time: 1 Week / Active Time: 6 Hours
Notes before we begin
Safety! Before stripping exterior paint, do a lead test! These tests give you an immediate answer as to whether or not lead is present. We are not sanding the tub (we use a liquid paint stripper) so the presence of lead does not prevent you from doing this project, but if lead is present you must wear a respirator and remove it and Local protocols should be followed for disposal, and as such do not eat.
Shit! Stripping the outside of the tub with Citri-Strip is a disgustingly messy process. Lay out a tarp or painters cloth, wear overalls or clothes you don’t mind destroying, and be prepared to spend a good chunk of time cleaning up. Brushes that you use with Citri-Strip will need to be cleaned with Goo Gone adhesive stripper or mineral spirits.
Ventilation! The product we are using to clean the inside of the tub is quite toxic. You’ll want to make sure you follow the directions on the package very carefully, and most importantly, it needs to be done in a well-ventilated area! If the tub you’re working on is in a windowless bathroom, you’ll need to bring it outside or into a room that’s well-ventilated. The fumes are strong and will last more than 24 hours.
Time is needed! This is not a project you rush into. While there isn’t a ton of hands-on time, curing and drying overnight is a lot of work, so expect to spend a full week between starting this project and taking your first bath in your beautiful new tub.
Generally we list the tools you’ll need in the order you’ll use them, but given that you may not need the exact items we do – for example But, if your tub doesn’t need interior repair or if it’s already empty. . In the exterior section – we have listed the big ticket items in the first grouping and the accessories like cleaners and safety equipment in the second grouping.
Important things
An old cast iron tub that needs some love.
3-4 quarts Citri-Strip Paint & Varnish Removal Gel + brush for application (for exterior paint removal). There are other possibly more effective paint removers, but Citri-Strip works well and its fumes are non-toxic, so we prefer it.
2 bottles of Go-Gon adhesive remover spray (this removes adhesive residue from citrus strips)
Rust-Oleum Tub & Tile Refinishing Kit + for brush or roller application (for interior refinishing)
JB Weld Marine Weld (for extra protection on any legs, optional)
Rust-inhibiting metal primer (the old standby Rust-Oleum Clean Metal Primer works just fine here)
Exterior paint in the color of your choice + paint brush, roller, or sprayer to use (we used Pure White SW 7005)
Simple Green Cleaning Spray
- Protective Gear: Safety goggles, cleaning gloves, dust mask
- Accessories items
- Steel wool
- Terry towels or old rags.
- 400 grit wet/dry sandpaper
- Paint scraper
- Wire brush
- Painter’s Tape
Prepare your work area and tub.
Remove all existing plumbing fixtures and (if not welded on) claw legs from your tub. Use your plain green, steel wool and terry cloths to clean the inside and outside of your tub to remove any loose grit or gunk. You don’t need to go to the trouble here, we’ll do that later. Just clean it thoroughly.
Put down your tarp or work cloth and your tub.
Clawfoot Bathtub Refinishing
Are you looking to restore your vintage bathroom fixtures?
Clawfoot bathtub refinishing can restore the original charm and beauty of Victorian clawfoot bathtubs, pedestal sinks and antique toilets.
Miracle Method has nearly 30 years of experience cleaning cast iron tubs and repairing and restoring clawfoot bathtubs and other vintage bathroom fixtures. All antique bathroom fixtures are works of art that deserve an experienced master craftsman to restore them. Fortunately, our unique process can make any porcelain as shiny and lustrous as it was crafted. Even deep porcelain chips or cracks can be repaired. Our craftsmen have restored 100-year-old barnyard bathtubs as well as Victorian bathtubs and pedestal sinks in historic hotels through cast iron tub refinishing.
Clawfoot Bathtub Refinishing
While new acrylic and Acrastone™ reproductions are being sold, nothing matches the look and quality of an antique, cast iron vintage bathroom fixture. A clawfoot tub is often the centerpiece of a bathroom remodeling project. You have many choices regarding the size, style and shape of the tub. The Miracle Method can help guide you through the restoration process and clean your antiques to your liking.
The miraculous method of clawfoot tub refinishing! Share on Facebook Like Pinterest
What do you want to know?
Clawfoot bathtub cleaning is not limited to any color. While the most common interior color is white, almond and ivory are also popular. And while it wasn’t common in the most prestigious homes of the 1900s, candy apple red is also an option!
Most clawfoot bathtubs have a rough, exposed cast iron exterior. To clean a cast iron tub, the first step is to sandblast the exterior to remove old paint, rust, and corrosion. Then, one option is to fill and sand the rough exterior to make it smooth and shiny. The exterior is then sealed and refinished in any solid color or one of our natural accents.
Clawfeet are in a class by themselves. Some are quite plain and simple. Others have bold designs or incredible animal claw detail. They can be refinished to match or contrast the exterior, but the recommended treatment is to have them plated in chrome, nickel, bronze or even gold. It depends on you.
Once your tub is refinished, The Miracle Method can help you find antique reproduction faucets, handles, drains, and overflow covers to make your antique tub functional.
Refinishing gave new life to this old beauty! Share on Facebook Like Pinterest
Miracle Method specializes in claw tubs and other period fixtures, including farmhouse sinks. We have the best porcelain cleaning process and craftsmen in the industry to provide a durable and beautiful restoration.
- Interior refinished in bright white.
- Exterior refinished in natural tones.
- Share on Facebook Like Pinterest
- Many miracle cure places stock unfinished clawfoot tubs and other antique fixtures. If you want a clawfoot tub or pedestal sink, give us a call and we’ll be happy to custom refinish and restore it for you.
- A miracle way to find an office
- To learn more about kilofoot bathtub cleaning and vintage bathroom fixture restoration, click Find a Location or call our toll-free locator number, 1-888-271-7690, to find the nearest Miracle Method can reach professionals.
During a recent bathroom remodel, I personally embarked on a claw foot bathtub restoration project. I found it surprisingly easy. Let me show you step-by-step how it’s done, and you’ll see for yourself!
What is a Cloft Tub?
Claw-foot tubs, also known as roll-top tubs, are defined by their prominent claw “feet” on the bottom of the tub that keep the tub off the ground. They are made of cast iron with a porcelain enamel interior. Once a bathing staple, now sought after for their cool, vintage look.
A few things to remember when renovating a claw foot bathtub
You are not Arnold Schwarzenegger.
These cast iron tubs are beasts, weighing at least 200 pounds, maybe more. A man or a woman will not be able to move the tub around. Make a list of help every time you move the tub, and watch your feet!Check size and care.
The ideal tub model would be a bathtub with a cooled exterior and a nearly perfect interior. Anything outside the tub can easily be blown away. Try to find a bathtub that has decent enamel inside, as the inside of the tub is very difficult to repair. It may not be worth trying to restore the inside of the tub. You can read this guide and decide for yourself.
The bathing area was quite long.
Kilo-foot bathtubs also vary in size. I decided that the original tub in our house was too high (your knees could hit it because you were sitting on the toilet, there was no other place for the tub). We definitely wanted to keep the clawfoot tub style, so we found a small 4½-foot tub on Facebook Marketplace. So we took the original bathtub to a metal recycling center, since no one was willing to take it (not even for free!).
Remove the hardware.
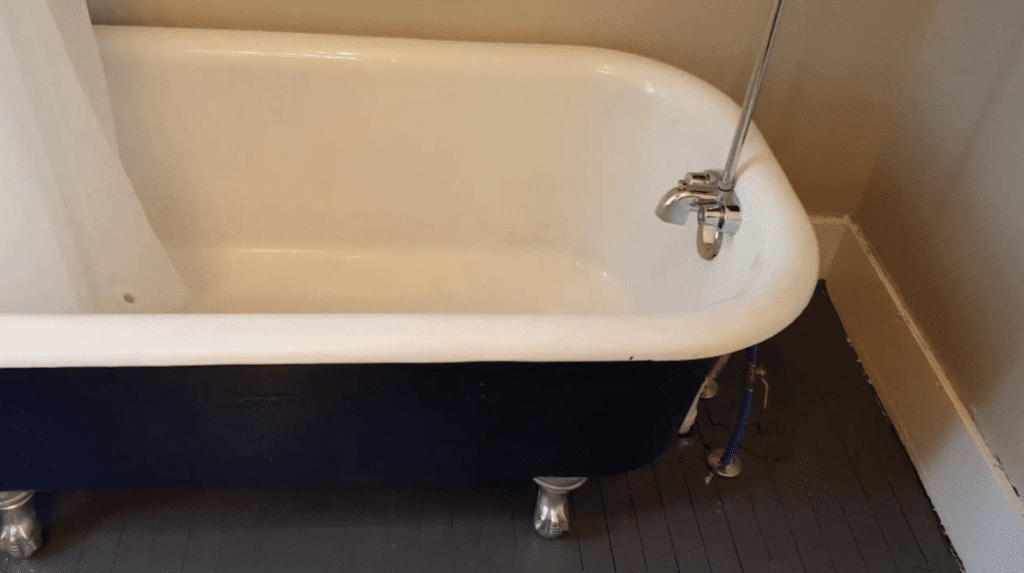
Before you begin the process of restoring a cubic foot bathtub, you must be able to remove the hardware. This includes faucets, faucets, fittings and drains. Be prepared to put your feet back in the middle of the process, as you’ll find out later in our guide.
Our bathtub had a pipe sticking out of the bottom of the drain that we were unable to remove, as you can see in the pictures. It did not hinder the recovery process. When it came time to paint the tub, I just taped it around.
How to Restore the Exterior of a Cloft Tub
You’ll want to work on the outside of the tub before starting on the inside, should you decide to work on the interior.
- Tools you will need.
- Before you begin, you’ll need to move the tub to a ventilated area, or make sure the area you’re working in is well ventilated.
- You’ll also want these things on hand:
- Paint remover, but that won’t be enough, so…
- Angle grinder
- Brush attachment for grinder
- long wire
- a breath
- Safety glasses
- Earmuffs (hearing protection)
- gloves
- Long-sleeved shirt, trousers and closed-toe shoes
- Buy a vacuum to clean up the mess.
- Wear protective clothing when sanding.
- Turn the tub upside down, remove the foot and grind.
- First, remove the foot to get the paint from the entire tub. Our feet slid in and out of the slots in the bottom of the tub and there was a screw to secure them. You may find that you need the help of a hammer to drive the feet in and out.
I found that the paint remover was not enough for my tub. After pressing the tub with a thick, gooey layer, what emerged was barely a layer of paint.
So I continued to remove the paint using an angle grinder with a brush attachment to grind off all the layers of paint (there were at least 3, no previous owner bothered to remove the paint before repainting). ). . Wear appropriate gear such as a respirator, safety goggles, and ear muffs.
I chose to sand the paint until I could see the bare cast iron layer, so that I could have the smoothest paint job when I repainted it.
Reattach the paint to foot grinding.
Once the entire exterior of the tub is exposed, it’s time to remove the paint from the claw feet. The tub itself makes a great “clamp” for the feet, especially if you don’t already have hands. Attach the claw foot to the tub and run the angle grinder up to the foot.
Make sure all the creases of the legs meet. After working, take the foot back. These will be painted separately from the tub.
At this point, you have sanded the paint. Go ahead and clear all the debris by grinding.
Clean with soap and water and rinse.
Time for a bathtub and a foot bath! Do this to remove any debris from the surface of the tub and feet. Remember that we are dealing with cast iron here, so dry the surfaces immediately after washing to prevent rusting. It’s very fast, watch out!
Allow the tub and legs to dry completely. It may be a good idea to run a tack cloth over the surface before applying the paint.
At that point, the tub was moved to the grass in our yard (still upside down). I used a rag and soapy water to wash the tub and used a hose to rinse it.
Paint the feet.
Painting claw feet
While waiting for the tub paint to dry, you can start painting the legs. We decided that we wanted the feet to look like they were a silver metallic material, but you could paint them any color you think would look good. Sometimes the claw tubs, tubs and feet, are all white.
I used a can of “galvanized steel” Rustoleum spray paint to clean the claw feet. I placed the feet one by one on a small piece of cardboard and worked to spray them around the feet. One or two coats is fine. Don’t forget to let the first coat dry completely before adding another coat.
Move the tub to the desired location.
Once the paint is completely dry (give it at least several hours, a few days to be safe), get your tub moving buddy and move the tub to where it needs to be. Consider leaving the claw foot out of the tub until it is moved to where you want it to be. That way, you’ll have less tubs to worry about sticking to walls, door trims, or handrails.
Attach the hardware.
Reinstall the feet and previous or new hardware on the tub and prepare it for your first soak. Since we only had one bathroom in our property, we decided to install a shower attachment with a shower curtain that was made specifically for claw tubs. The shower attachment was installed in the bathroom spigot, one point on the nearest wall, and two points in the ceiling.
At this point, since the interior was in good condition, our tub was all set to be used. We love the way it looks in our newly remodeled bathroom!
If you’re choosing to refinish the inside of the tub, you’re not done yet. Read on to find out what to do next!
- Clawfoot bathtub restoration complete
- How to Restore the Inside of a Clawfoot Tub
- DIYer’s, proceed with caution.
- For the outside of your claw tub, all you need to do is remove the paint and repaint. Indoor cleaning requires many different chemicals and agents. There are DIY bath refinishing kits out there, but they’re hit or miss when it comes to good surface quality. You may choose to hire a professional service to clean the inside of your tub.
Clawfoot tubs, depending on the area you live in, are fairly easy to find second hand. We found a great option on our local Facebook Marketplace, but you can also look on Craigslist. If you can find a tub with a nice enamel coating on the inside, go for it, as restoring the inside of an enamel tub is not that easy.
If you’re stuck with a bad enamel tub, and absolutely have to DIY, you can work with this and create a great-looking one in no time. Here’s how you do it the right way.
Note: During this full claw foot bathtub restoration, make sure you have adequate ventilation by staying outside, opening windows, using a fan, and wearing a suitable respirator.
Clean the surface.
You need a clean, even surface to work on. Remove any debris, soap scum, caulking, or previous “repairs”. This may require a special cleaner, or a lot of elbow grease.
Chemical bath
After cleaning it, you need to start removing the old enamel. This requires a series of chemical layers. This is a bit technical, so pay close attention.
First, rub the enamel with an alkaline emulsifier. These are usually used to clean carpets or remove wax from floors. Next, wipe with an acid-based cleaner (like lemon) to neutralize the emulsifier, then follow it all up with some ethyl alcohol to get it all clean.
Fill scratches and dents.
Sometimes, there are dings and scratches on the inside of the tub. Use a trowel and some fiberglass putty to fill these holes. Follow up with sanding, glazing putty and sanding again if necessary. If the debris is excessive, run a vacuum and then wipe the porcelain surface with a tack cloth to remove all dust.
Prepare the tub for the new enamel coating.
To bond the new enamel layer to the inside, you need a quality bonding agent. This is where the DIY restoration process gets tricky. You need to find something that will adhere the new coat of enamel to the tub and not damage your pipes when you flush it down the drain.
When you look for a product for this, make sure it’s “eco-friendly” and specifically states that it won’t harm your plumbing. Otherwise, you may end up doing more than you started with.
Follow the directions on the bottle to apply whatever bonding product you decide on.
Spray acrylic urethane enamel.
You will want to use a paint sprayer and spray about 3 coats of the new acrylic urethane enamel. This can be done with an airless paint sprayer or a paint sprayer attached to an air compressor.
Again, make sure your space is properly ventilated. This paint your local.
Cleaning the tub is much cheaper than buying a new one, and the results are great.
When looking for my current apartment, I was immediately drawn to the large bathtub – a true soaker from an era when bathing was savored and rain described as rain. But my joy was quickly dashed when I saw the rusted gully at the bottom, a permanent leak that had eroded the white porcelain tub and exposed the tub’s cast iron shell. was done
The building super promised to fix it – and he did, slapping on some latex paint that cracked every time I got in for a hot shower. Super’s methods were questionable, but he was basically on the right track in trying to resurface the tub.
It’s Old House Plumbing and Heating Expert Richard Trethewey says, “People often tear out old tubs because they have a little stain on them.” “But finding an affordable bathtub with the shape and size of a period tub isn’t easy.”
Is it worth it to clean the bathtub?
Every year refinishing shops across the country salvage thousands of tired old tubs and sinks by spraying on an acrylic urethane resin coating. Done correctly, either in-shop or on-site, sink or tub resurfacing is an effective and inexpensive solution to porcelain that is chipped, rough-worn, or simply discolored. Is.
How much does it cost to refinish a cast iron tub?
For an average cost of $350 to $500 — a fraction of the $1,200 to $5,000 cost of a new cast iron or steel tub — refinishers can make antiques look brand new. “Professional refinishing can be a cost-effective solution for that retro look,” says Tretheway.
Jackie Metropoulos chose to do just that, and hired Scott Ayers, a technician at the Miracle Method franchise in Ludlow, Massachusetts, to replace the old cast-iron bathtub in her and her husband Matt’s 1919 home in Longmeadow, Mass. Revive again. Their second-floor bathroom has a mix of old charm and new shine, but the built-in tub looks weathered, with a green watermark under the faucet, several nasty dings on the lip, and years of improper cleaning. A dull, rough texture from . .
Ayers, an auto body repairman, refinishes tubs using many of the same techniques he used on Fender. He fills dings and scratches with putty before polishing the finished product with Power Buffer.
- Ayers, an auto body repairman, refinishes tubs using many of the same techniques he used on Fender. He fills dings and scratches with putty before polishing the finished product with Power Buffer. David Cormack
- the process
- Clean and remove.
- To prepare for refinishing, Ayers first trims the caulk between the tub and the walls and floor with a putty knife, then removes the drain cover and masks the faucet. The edge of the coating will be hidden behind the refitted fixture and there will be a new bead of caulking.
He then cleans the tub to remove impurities that might interfere with the adhesion of the new finish: He scrapes off the soap scum with a razor blade, then rubs on an alkaline emulsifier that usually Used to remove wax from floors. He follows with an acid-based citric cleanser that neutralizes the emulsifier, and after washing and drying the tub, cleans it with denatured alcohol.
Fill dings and scratches.
The auto body repair man, Iris, applies fiberglass putty to deep chips and scratches, just like he does on a damaged car door. (If the tub had been bleached and drilled hard, it would have had to be sanded over the entire interior.) After the fiberglass hardens, he sands it with a coarse 36-grit paper to knock out the high spots. and an 80-grit paper. . To finish it off, he fills any pockmarks in the dry fiberglass with polyester glazing putty, waits for it to set, then sands it the same way.
After wiping with a tack cloth, he dabs on a bonding agent that enables the acrylic urethane enamel to adhere to the porcelain’s glass-like surface. Many refinishers roughen the surface of the tub by brushing on a solution of hydrofluoric acid before applying the bonding agent. Critics of acid etching point out that the acid must be properly neutralized before drain flushing or it can harm the pipes as well as the environment. Miracle Method’s proprietary bonding agent eliminates the acid etching step.
Before spraying, Iris applies a blue bonding agent to the entire surface of the tub, an essential step to ensure the new finish won’t peel off the old porcelain
Before spraying, Iris applies a blue bonding agent to the tub’s entire surface, an essential step to ensure the new finish won’t peel off the old porcelain. Photo by David Cormack
Apply three coats of acrylic urethane enamel.
As the bonding agent sets on Metropolis’ tub, Iris slips on the Tycoon suit and straps on the air mask attached to the ventilator.
Clawfoot tub restoration
- Bring your antique bathtub back to life.
- The timeless beauty of Kilofoot bathtubs makes these beautiful pieces sought after by many for both comfort and style.
- An old worn tub before the Wrigleys
- Before
- New Leaking Tub after Wrigleys
- after the
Facts About Clawfoot Tub Restoration
Clawfoot bathtubs are usually reglazed in our shop, although interior work can be done in your home.
You choose from a variety of colors for both the inside and outside of your claw tub. We keep track of your specifications.
Our finish is the best available.
This process takes several days for the tub to properly cure.
We also offer original and reglazed clawfoot bathtubs with a complete line of accessories.
claw foot
Red refinished bathtub
Claw foot tubs and older pedestal sinks are more common in older homes. The products used to make claw foot tubs are no longer commonly used but are by far the most durable bathroom materials. “They don’t make them like they used to.” In many cases, these tubs and sinks have been passed down from generation to generation. They may be family heirlooms and/or have sentimental value to them.
Refinishing your claw foot tub or pedestal sink can restore the tub’s appearance and give your bathroom a custom and unique look. In many bathroom remodels, some customers are looking for a look that a standard tub can’t help achieve. Clawfoot tubs and antique sinks give a more traditional look and feel than a bathroom remodel. This is why claw feet can be found for sale by the thousands. Also now that they are rarely produced, their value has increased over the centuries!
Most claw-foot tubs and pedestal sinks have been painted several times before. We will remove any existing paint necessary to prepare for your new finish. PBRA has expert clawfoot refinishing technicians who will restore your clawfoot tub or pedestal sink to a highly durable glossy finish. Keep your claw tub for life.
Let’s regalize your toenails with a color of your choice! We receive many requests for custom colors for clawfoot tub exteriors that customers match with their vanities, toilets and other bathroom accessories. We can also do outdoor claw foot bathtubs in stone finishes and solid colors. The choices are endless. We have dozens of standard colors to choose from. You can take it a step further if you can’t find the color you want from our color charts by having a color swatch provided by your local paint retailer. We will provide color match. Call us for more details! Check out our tub gallery for inspiration for your reglazing project!
Rare 1926 6′ Vintage Cloft Tub – SOLD.
Professionally restored inside and out, gloss white with matte black feet.
Originally produced in 1926, this cast iron tub has been restored to a beautiful piece of art. If you are lucky enough to find one of these in used condition, they will be $1500-2500 and still need to be restored. This restoration is beyond regular refinishing. It went through extensive coats and wet sanding and polishing like you would in auto body work. The pictures don’t do it justice so if you want to see it call or email me to make an appointment. Note that it’s 6′ which is larger than normal for a tub, but great for tall people (or short people who want to swim)! These old original 6′ claw foot tubs are a full 72″ end to end and the newer 6′ tubs available today are only 68″ end to end.
How to Clean a Vintage Clawfoot Tub
Step 1: Find a tub.
Look for a tub with intact porcelain enamel. Enamel is the hard, shiny surface that coats the inside of the tub. The outside of the tub can be sanded and painted, but the enamel inside the tub is more difficult to restore.
My advice is to stay away from chipped or severely rusted enamel, but don’t let dirt or even moderate rust deter you.
Tip: Use a rag (wet if possible) to clean problem areas before buying. Most numbers will come right away!
If you end up with chipped or rusted enamel, it’s possible to give the inside of your tub a new surface. Brave souls can buy a kit and DIY it. Alternatively, you can hire a professional rehab specialist.
Here’s another tub I almost bought at my local re-store. It was cheaper than the tub I eventually bought at a flea market, but there were several significant chips in the enamel, some serious water stains from the faucet area, and lots of old flaky (and possibly lead) paint on the exterior. There were paints.
How to Clean a Vintage Clawfoot Tub Yankee Homestead
save it.
I hadn’t had a chance to research tub refinishing yet and was quite apprehensive about its condition, so I gave it a pass. Maybe it would have come out fine after some serious sanding and scrubbing, and that enamel chip was on the side that wasn’t too noticeable.
But I’m happy with the tub I got: most of the stains disappeared with a good cleaning, plus the exterior of the tub was already paint-free (albeit rusted). And our tub came with seven of the eight attachment pieces for the feet.
Step 2: Gather the supplies.
- Here’s what we used
- Heavy duty respirator
- Safety goggles
- 4″ Sanding Disc (Drill Mount)
- Unloading device
- The shop is empty
- Wire brush
- Sand paper
- Spray primer
- Protective enamel
- Small rollers
- Small paint brush
Step 3: Clean the tub.
We actually did this part last, unintentionally. We flipped the tub over and lifted it to sit on top of a makeshift work table, and let me tell you, flipping a cast iron bathtub is not easy! So it stayed there while we cleaned the outside of the tub.
How to Clean a Vintage Clawfoot Tub Yankee Homestead
save it.
Throughout this process I was so nervous that we would run into problems when it came time to clean the interior and I wish we had cleaned it before we turned it upside down. Thankfully the inside of the tub turned out fine, but I definitely recommend cleaning the inside of your tub first.
Greg actually did this part of the job because we were running out of time and I had so many other projects going on! He likes to joke that I am a visionary and he provides manual labor. Which is mostly true, what can I say? We make a good team.
She cleaned our vintage clawfoot tub with wild orange oil and hydrogen peroxide, and we ended up using a bit of this natural cleaner.
The finished result surprised us: no need for refinishing! The groove area still looks a little dirty, but it doesn’t bother me and most people won’t even notice.
There are also some small rust spots on the top of the overflow cover, which I can touch up with an enamel kit. For now, I think the flaws make the tub authentic, like it’s been here forever.
How to Clean a Vintage Clawfoot Tub Yankee Homestead
save it.
Step 4: Sand the exterior.
Again, Greg performed the step. He did it all in just a few hours!
Important: Please wear a serious respirator for this step. You don’t want to mess with the possibility of inhaling lead paint dust. Safety glasses are also important.
First, he used a sanding disc to remove most of the paint from the outside of the tub.
How to Clean a Vintage Clawfoot Tub Yankee Homestead
- Then he used a heavy-duty stripping tool to get inside the lip of the tub where the sanding disc couldn’t reach.
- How to Clean a Vintage Clawfoot Tub Yankee Homestead
- save it.
- In the end, he went full tub with shop vac.
- How to Clean a Vintage Clawfoot Tub Yankee Homestead
- save it.
- Step Five: Prime the exterior.
- Important: I recommend taking a deep breath for this step as well. And glasses again.
- How to Clean a Vintage Clawfoot Tub Yankee Homestead
- save it.
- And now for my part: I primed the exterior of the tub with two coats of Rustoleum Professional Primer. It was so rewarding to see that old tub turn white! Well, actually it went gray first, because I used a gray primer.
- How to Clean a Vintage Clawfoot Tub Yankee Homestead
- save it.
- I followed these steps:
- Wipe: Before applying the primer, I gave the tub a good wipe down, first with a dry rag and then with a wet rag and finally with a dry rag again.
- First coat: Shake well and spray evenly to cover entire surface.
- Second coat: Follow the directions on the paint can when dry, and then repeat step 2.
- Step Six: Paint the Exterior.
- I did this part too! See I helped.